

Did you know that you can grow and plant your own sweet potato plants by starting slips from an existing sweet potato? Not only is it possible, but it’s a great, inexpensive way to grow healthy and strong sweet potato plants.
Sweet potatoes are packed full of vitamins A and C, potassium, fibre and manganese. Not only are they good for you, but they are also one of the most versatile vegetables around. But as popular as the vegetable has become, growing them in a garden is somewhat of a mystery. The good news? Sweet potatoes couldn’t be easier to grow.
Unlike traditional potatoes that sprout from the eyes of seed potatoes, sweet potatoes are grown a little differently. Instead of using seed potatoes, sweet potatoes grow from what’s referred to as slips – which are nothing more than miniature sweet potato plants that grow from the roots of an existing sweet potato.
Once they grow from the sweet potato, slips can range between four to six inches long and have a few sets of leaves on top. It’s these slips that then get planted into the ground much like you would transplant any other vegetable.
How to start and grow your own sweet potato slips
Sweet potato slips can be started from an existing sweet potato using soil or water as the growing medium. You need to aim to start your slips about 6 weeks before planting outside to give them plenty of time to grow. No matter whether you use soil or water for starting, always use an organic, untreated sweet potato.
Starting sweet potato slips in soil
If starting in soil, fill your container about half full of soil. Place an unblemished whole sweet potato halfway into the soil on its side. The soil should always be damp, but not soggy or saturated.
Once ‘planted’, leave your sweet potato in a warm, sunny location. The warmer the soil, the quicker the sweet potato will produce slip sprouts. For the ‘sunny’ part, a window sill works well. Just be sure to locate in a window that receives light at least six hours a day.
Usually within two weeks, you will begin to see new slips forming and shooting up. Once your slips get to around four to six inches, break off the slip at the base of the potato and place it into distilled or tap water to root. Continue to keep the slips in sunlight or artificial light each day.
Once roots form, you can plant them into the soil to create soil transplants – or leave them in the water to create bare root transplants. Your original sweet potato will continue to grow new slips even after you ‘harvest’ plants. All you need to do is continue to break off and start more slips as needed.
Starting sweet potato slips in water
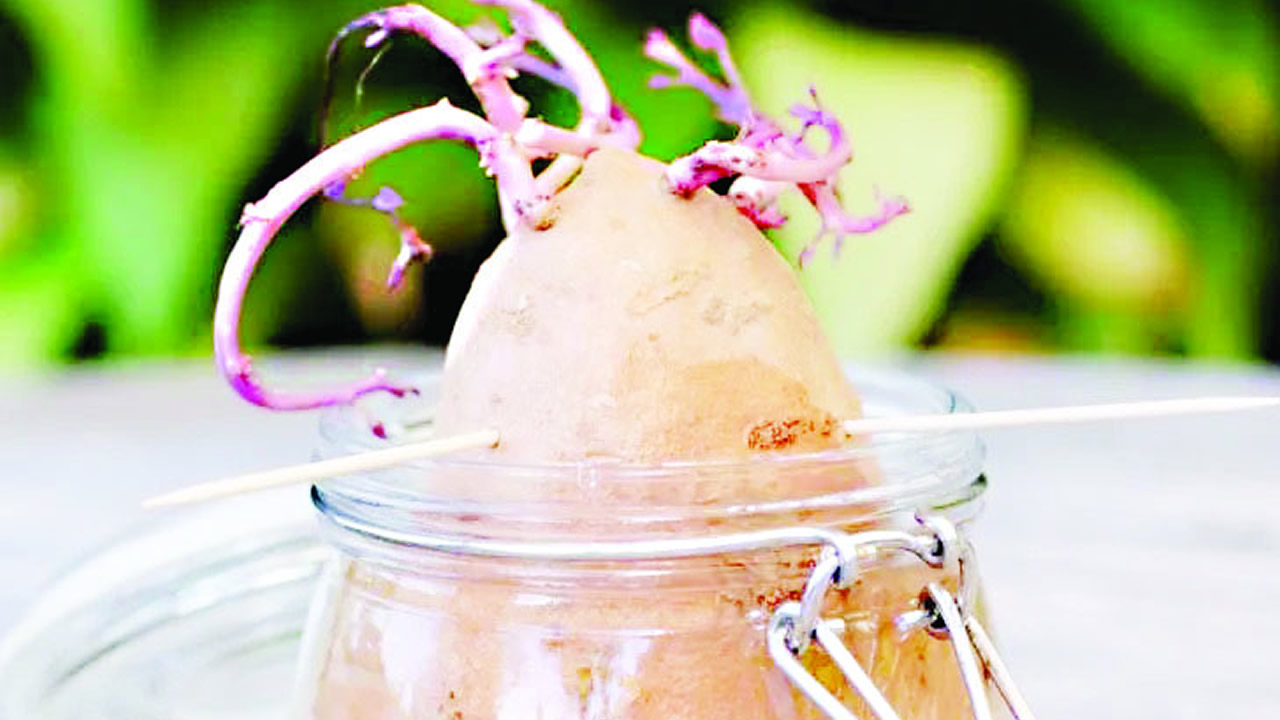
You can also create your slips entirely in distilled or tap water. To do this, place a couple of toothpicks into the potato and allow them to rest on the rim of the jar. You want half of the sweet potato to be resting under water.
Place the container in the warmest room of your house to speed germination. Similar to starting slips in soil, the container needs at least 6 hours of sunlight each day. Once again, a sunny windowsill is perfect for this method.
You will usually see slips develop at the top of the sweet potato within 2 weeks. Allow them to grow to around 4 to 6 inches before snapping off at the base and placing them into water to root.
Once roots form, you can plant them into soil or leave them in the water for bare root transplants. Both soil and bare root work well when transplanting into the garden, it really comes down to a matter of personal preference.
Harvest Time
You can start to harvest sweet potatoes as soon as the plants begin to yellow. However, the longer they stay in the ground, the more they will continue to develop additional flavour. You can partially harvest well up until the threat of frost. Take only what you will be using until you are ready for the full harvest.
Sweet potatoes store for a long time if kept in a cool, dark place. But before storing, they need to go through a curing process first. Curing is a simple step to let sweet potatoes dry out completely before moving to long-term storage.
In addition, curing also aids in sweetening the potatoes. To cure, begin by gently brushing all of the soil off of the skins. Don’t use water as they will store much better if you keep them from becoming wet.
Once brushed off, place in a well-ventilated but warm spot for 10 to 15 days. A back porch, barn or garage are all great places to cure. After the curing period, the sweet potatoes are then ready to find a cool, dark spot for long-term storage.

















Leave a comment