

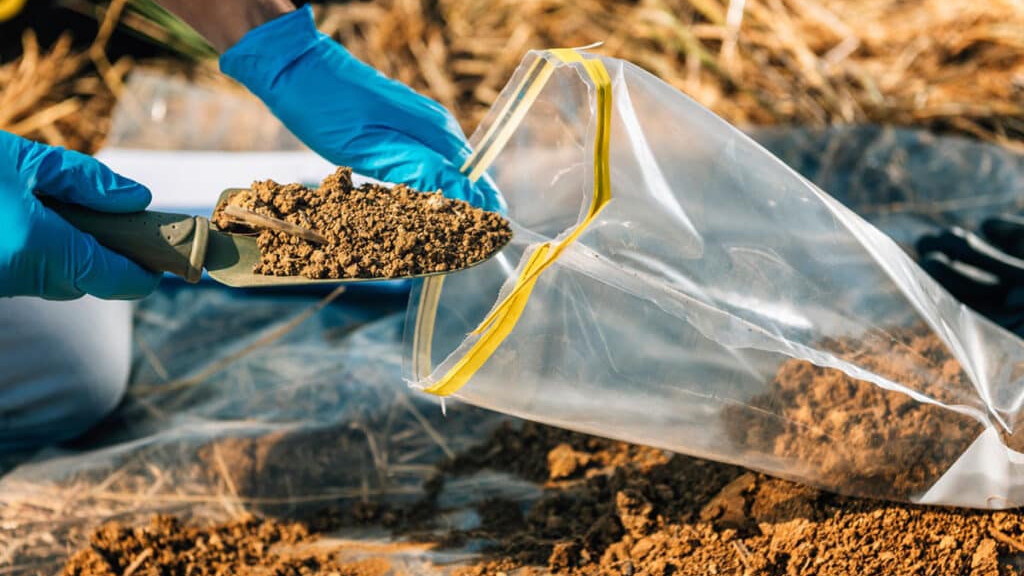
Healthy soil is the starting point for every successful harvest.
In Eswatini, however, Soil Science and Plant Nutrition Research Officer in the Department of Agricultural Research and Specialist Services at the Ministry of Agriculture Bongani Mvubu, says that many fields are losing fertility due to erosion, overgrazing, nutrient mining, deforestation and changing weather patterns.
“The good news is that farmers can reverse this trend by getting to know their soils better through soil sampling and liming.”
Why test your soil?
“Just like people visit the doctor for check-ups, soil also needs a ‘health test’ before crops are planted.” Soil testing helps farmers to know:
If the soil has enough nutrients for the intended crop
- Whether the soil is too acidic or alkaline
- How much organic matter and fertility the soil contains
- The right type and amount of fertiliser and lime needed.
Armed with this information, he mentions that farmers can avoid wasting money on unnecessary inputs while ensuring crops receive exactly what they need for strong growth.
Types of soil tests
- Chemical soil tests: These focus on soil fertility and nutrient status.
- Physical soil tests: These assess the physical structure and behaviour of soil.
- Biological soil tests: These assess the activity and diversity of soil organisms.
Soil sampling
Soil sampling is the first and most critical step in the soil testing process.
“Accurate and representative soil samples are essential for obtaining reliable data about soil fertility, structure and biological health. Incorrect sampling can lead to misleading test results and inappropriate management decisions that affect crop yields, soil sustainability and environmental quality.”
THINGS TO NOTE WHEN SOIL SAMPLING
To ensure accuracy, consistency and meaningful interpretation of soil test results, the following general guidelines should be followed:
TIMING OF SOIL SAMPLING
Best time: Before planting, during the dry season or after harvesting when the soil is stable and not recently applied fertiliser.
Avoid sampling:
- After recent fertiliser or manure applications
- During extremely wet conditions (wet soils are harder to handle and analyse)
- From road edges, animal paths
Soil sampling depths: Different depths reveal different layers of nutrient availability and soil conditions:
Topsoil (0–20 cm): Most relevant for nutrient availability and crop root zone.
Subsoil (20–50 cm or more): Important for deep-rooted crops, salinity and compaction assessment.
NUMBER OF SAMPLES
- Take 10–20 sub-samples randomly across each field or management zone
- Combine to form one composite sample per zone/field
SOIL SAMPLING TOOLS, MATERIALS
- Soil auger or probe (preferred), or a clean spade
- Clean plastic bucket
- Sample bags or containers (clearly labelled)
- Trowel (to mix sample)
- Permanent marker, GPS or map for location tracking
- Field notebook for recording data
Steps in soil sampling
Step 1: Divide the field into sampling units:
- Determine whether the field is homogeneous or heterogeneous and categorise the area into similar topography, management history and/or crop performance
- Selecting appropriate sample collection methods
- Preparing all soil sampling tools and equipment
- Then starting from one corner, take two steps in the field and have your first station or spot for sampling
Step 2: Collect soil sub-samples:
- Use a zigzag or W-shaped pattern across the sampling unit
- Take a sample every 15 paces along this path
- Each place from which you take a sample is a ‘sampling station’
- Before taking the soil from each soil station, it may be necessary to remove any plant debris and trash from the surface
- Take soil samples within 5-20cm of the topsoil (root zone)
If the field is ploughed, take sample from above, if not, remove top 5cm and take sample from 5 to 20cm below the ground using a spade or hoe or trowel to dig but preferable use a soil auger and put that soil into the plastic bucket
Follow a W pattern as shown in figure 1 and stop every 15 steps to take a sample. Thoroughly mix the collected soil in the bucket upon reaching the end of the field
From the thoroughly mixed soil, scoop a cup full of the mixture into a clean sampling bag or ice plastic bag to avoid contaminating the soil sample which may result to fault analysis, interpretation and conclusion. Tie the sample to avoid spilling
Finally, write all information about sampling area on soil sampling card or paper and stick the card or paper on the outside of the sample. Avoid putting the paper in the soil directly as it might get wet and erase the information written on it
Step 3: Prepare a composite sample:
- Mix the sub-samples thoroughly in a clean plastic bucket
- Remove stones, roots, or large debris
- Place about 0.5 to 1kg of the mixed soil into a labelled sample bag
Step 4: Label the sample and this includes:
- Farmer’s name and pin number
- Plot or field name/number
- GPS coordinates (if available)
- Date of sampling
- Depth of sample
- Crop history and management notes
Step 5: Submit sample to the laboratory:
Send the sample to a certified soil testing laboratory as soon as possible (Malkerns Research Station, Mhlume Laboratory and Triomf Laboratory, near Matsapha Airport)
If delayed, air-dry the sample in the shade before sending.
WHAT HAPPENS AFTER TESTING?
The lab results will tell you:
- The pH of your soil (is it acidic or alkaline?)
- Levels of key nutrients like nitrogen, phosphorus and potassium
- The soil’s texture (sand, clay, loam) and organic matter
- With this knowledge, farmers can apply the right type and amount of fertiliser and lime, avoiding wastage and ensuring crops get exactly what they need.
Lime to correct soil acidity
Many soils in Eswatini are acid in reaction, which locks up nutrients and reduces crop performance. When soil tests show acidity, the best solution is lime application.
Timing
- Apply as soon as you receive your soil test results
- Ideally, apply lime 2–3 months before planting so it has time to work. If you are late, it is still better to apply before or during planting than not at all
- Apply during the dry season when soils are accessible
Method
- Measure your actual field size to calculate the exact number of bags required
- Broadcast evenly over the soil surface
- Incorporate into the soil (10–20 cm depth) using a disc harrow for faster effectiveness
Frequency
- Lime may be needed every 3 to 5 years, depending on rainfall, soil type and fertiliser use. Sandy soils and heavily fertilised fields usually need it more often
- Monitor pH regularly to decide if reapplication is needed
Which crops benefit most?: Maize, beans, vegetables and many other crops perform better when soil acidity is corrected.
How to apply lime?
- Plough your field to a depth of 30cm
- Divide your field into squares that can fit a 50kg bag of lime (use chart as shown)
- Place a 50kg bag of lime on each square
Final word to farmers
Good harvests begin long before planting. By knowing your soil, testing it and applying the right fertilisers and lime, you are investing in stronger crops, better yields and healthier land for the future.
Remember, healthy soils = healthy harvests = healthy families.
















Leave a comment